 Speedlines are one of the most simple ways to add energy and drama to a comic panel, but unfortunately they're also one of the most tedious things to actually draw. However, Photoshop's powerful and versatile brush settings can be used to create them much more quickly.
This section of the tutorial will talk you through the process of creating a set of speedline brushes. In the second part, I'll show you how to combine the brushes you've created with the path tool to quickly create linear and radial speedlines. It's worth bearing in mind that this method does not give the exact control and results of painstakingly creating them by hand with a pen and ruler. Also, while there's nothing hugely advanced in this tutorial, I'm going to assume the reader has at least some familiarity with Photoshop before trying this.
Making the Brushes
A Photoshop brush is composed of 2 parts: tip shape and presets. We're going to make the tip shape first.
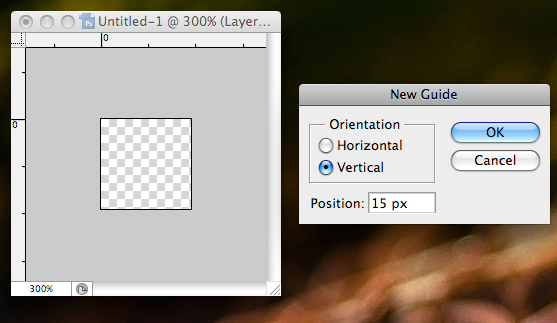
1) Create a new, transparent file 30x30 pixels in size. Next, click View>New Guide and create a vertical guideline 15px in.
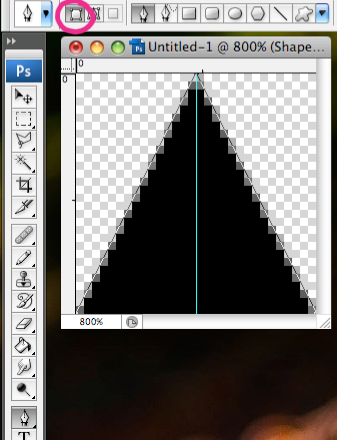
2) Create a new layer and turn on snap (View>Snap) if it isn't on already. Select the pen tool, make sure it is set to shape (circled on the screenshot) and use it to make a symmetrical black triangle, pointing up like this.
3) Go to Image>Image Size, deselect 'constrain proportions', and resize your image to 2500 pixels tall. This is the largest size a photoshop brush can be in any dimension, which will make your brush as versatile as it can be.
4) You now have the base you're going to build the brushes from. Save it, so that you can come back to it. We're going to make a few different brushes from this. Our first brush is going to be a fairly thick speedline. Click Edit>Define Brush Preset... and name it 'Thick Speedline'. We're going to adjust the presets in a moment.
Note: Photoshop CS3 does not appear to let you define the brush if the vector mask (the black triangle) is the active layer, but it works fine if the other layer is selected. If this does not work on your version of photoshop, try rasterizing the shape layer.
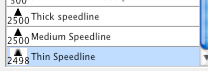
5) Let's make some thinner ones. Resize your image to 20px wide and define another preset called 'Medium Speedline'. Resize it again, to 10px wide this time, and call this one 'Thin Speedline'. You're going to need these names because the thumbnails will look very similar. You can make further, thinner versions if you like, though the thinner you go the less smooth the tapering will be.
The Presets
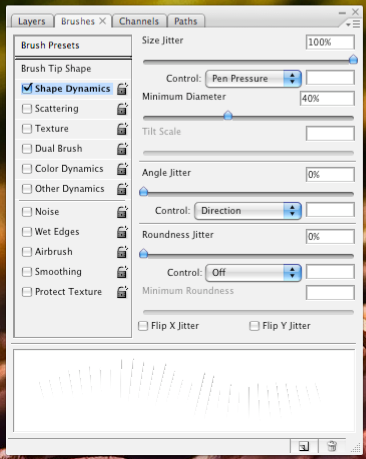
6) Now it's time to make those shapes into useful brushes. Make yourself a nice big image for testing them out on as you work. Go to your brush pallet, select the thick speedline and input these values:
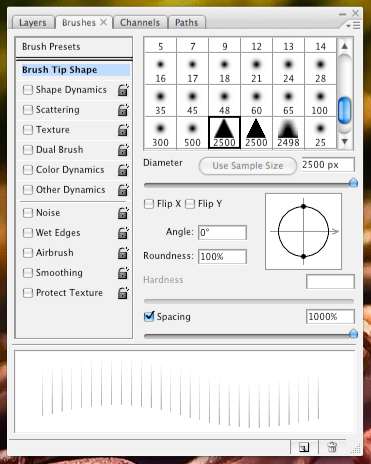
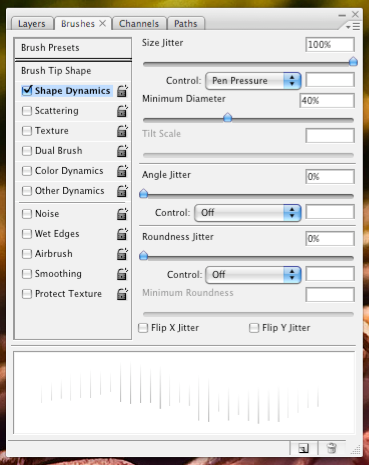
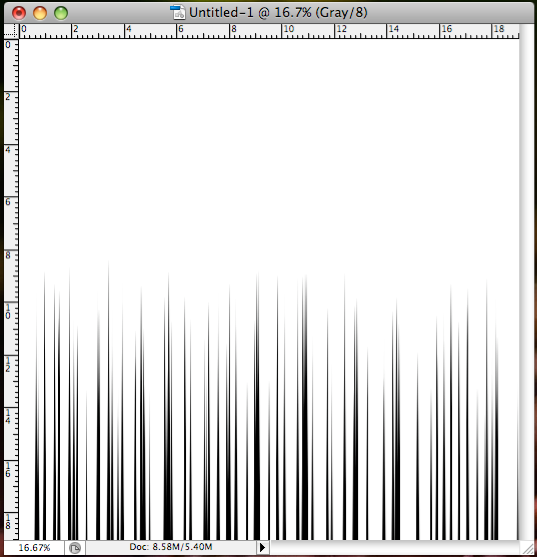
This will give brush that will create this in a few strokes:
Feel free to tweak these settings a little. Lowering the minimum diameter setting will give you more variance in the length and thickness of the lines. If you want to alter the length without effecting the thickness as much you can do that with the roundness jitter settings. Set the controls to 'off' for random, or 'pen pressure' if you'd like to control it manually. You can adjust the angle in the brush tip shape pane to whatever angle you like, and simply paint the speedlines onto your image. It's worth saving this preset somewhere as it is fast, easy and quite useful for linear speedlines. However, for this tutorial we're going to add another setting, which will allow us to use it with paths.
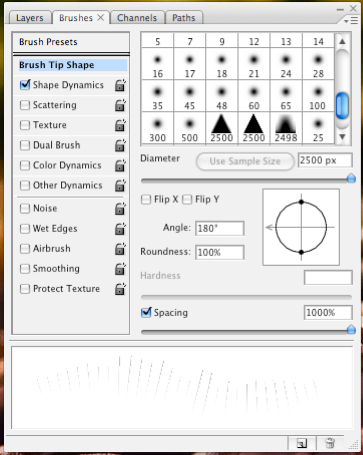
7) Set the angle to 180 degrees on the tip shape pane, and the angle jitter to 'direction'. Make sure the slider is set to 0. Click the little menu on the brush pallet, select 'New Brush Preset...' and name it something like 'Thick Path Speedline'.
8) Click the little lock next to 'Shape dynamics' so that it is closed. On the Brush Tip Shape pane, select your medium speedline. Drag the spacing back up to the maximum, and set the angle back to 180 degrees. Make a new brush preset with it and name it Medium Path Speedline.
9) Repeat the previous step with your thin speedline tip shape.
10) Save your brushes. Photoshop will save every brush you have in your pallet when you do this, so you may want to delete all of them but the ones we've just created so that you can save them separately.
On to part two...
10 comments:
hey there...
I was reading your tutorial and I may've skipped a step but I think you forgot to mention how to save them to a brush in the first place..
It's on step 4, you go to edit > define brush.
Thank you so much for posting this tutorial, it was extremely helpful :)!
:) This is awesome thank you, I should have looked for this sooner.
This tutorial was very helpful.
Thanks Katy!
None will ever read this comment since it seems to be an old post.. But how do you make the "line" shape? My triangle keep that shap, it doesn't become a line!
But I think I've followed every step of the tutorial..
Interesting topic what you have shared with us. Your writing skill is really very appreciative. I love when you share your views through the best articles.Keep sharing and posting articles like these.This article has helped me a lot.Keep posting this stuff.
clipping path service company
I really loved this so thank you, helped tons^^ I wanna add one more tip to it tho. It's kind of hard to constantly change angle if you need it in arc or circle right? Make these in a line and go to Filters -> Distort -> Polar Coordinates. it's going to place them in a perfect circle for you. Problem solved, hope this helped ^^
Such a really helpful write-up. extremely fascinating to check this message. I would wish to thank you for the efforts you had produced for putting this on ink awe-inspiring write-up. Please visit our website: Clipping path service
joya shoes 352k1cinpo506 joya sko danmark,joya sko norge,joya skor stockholm,joya cipő,joya zapatos,joya schoenen,joya scarpe,joya chaussures,joya schuhe,joya schuhe deutschland joya shoes 289d8eqlid068
Post a Comment